


When we bought the house, the garden had definitely seen better days.
Right at the back was an old metal shed. It looked like it had survived several decades of British weather. Next to it was a tired decking that had started rotting in places. Before we could even think about landscaping, planting, or making the space usable, everything had to come out.
This was the very first proper weekend of the garden renovation project — we have originally thought this will be an easy first step but it turned out to be far more physical than we expected. If you’re planning to remove a metal shed yourself, here’s exactly how we tackled it, what tools helped, what caught us out, and a few things I’d definitely do differently next time.
Is Removing a Metal Shed a DIY Job?
Yes — absolutely! But it’s one of those jobs that looks deceptively easy from a distance. You imagine unscrewing a few panels and carrying them away… but once you start dealing with rusted bolts, sharp metal edges, unstable sections, and years of hidden mess underneath, you quickly realise it’s proper demolition work… and don’t start me on the spider nets!
Still, if you take your time and work methodically, it’s very manageable for most DIYers.
Safety Precautions Before You Start
This is probably the least exciting part to talk about, but honestly it matters. Old metal sheds can be surprisingly dangerous because:
- Rusted sharp edges
- Loose panels
- Hidden screws and nails
- Unstable framing
- Heavy roof sections
So before you start:
- Wear heavy-duty gloves
- Use safety goggles
- Wear sturdy boots
- Work in two if possible
- Keep children and pets away from the area
- Disconnect the power connection to your shed before touching anything.
The metal panels can become unstable very quickly once sections start coming apart, so it’s important to dismantle the shed methodically rather than simply pulling pieces off randomly. Also, if the shed is heavily rusted, expect some bolts and screws to snap rather than unscrew cleanly.
Tools Needed to Remove a Metal Shed
Here are the tools that made the job much easier for us:
- Socket set or spanners
- Cordless drill/screwdriver
- Pry bar or crowbar
- Hammer
- Work gloves
- Safety glasses
Would have been nice to have:
- Reciprocating saw
- Ladder
- Wheelbarrow or garden cart
- Magnetic sweeper for screws and metal fragments
- Skip if you shed is large and you haven’t got any means of transport (although you can scroll down to find out how we managed without it)
Step-by-Step: How We Removed the Shed
1. Empty Everything Out First
Before demolition started, we emptied the shed completely. It is safe to assume that this will take you longer than expected. We had it easy having bought the house recently, the shed was emptied by the previous owner during the move.
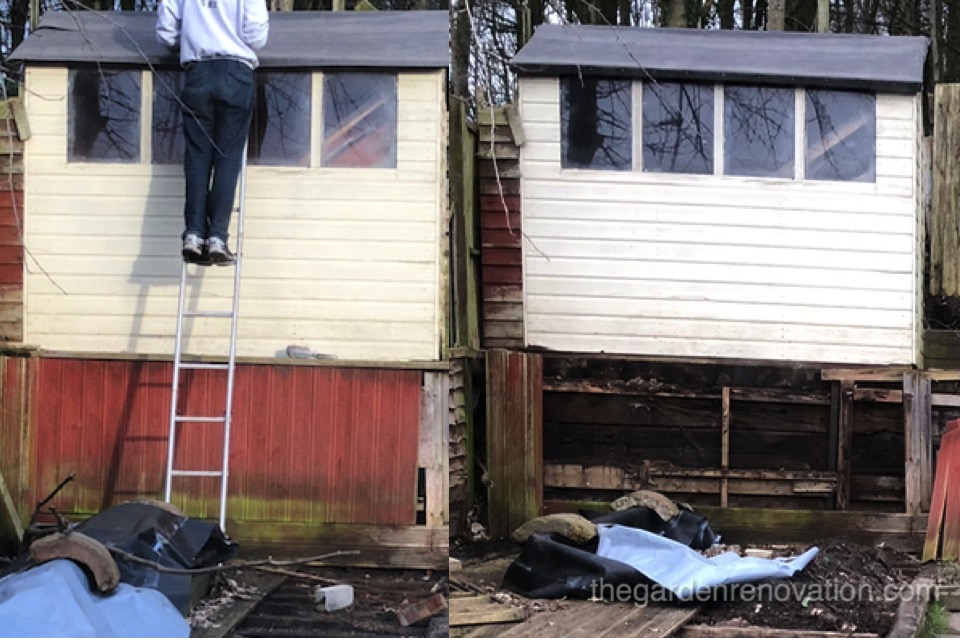
2. Take the Roof Off Carefully
The demolition started with the flat roof. Since the shed was at the back corner of our property, we’ve performed some acrobatics and precarious balancing on the neighbour’s fence to get all the screws. A ladder would have been useful here, but at that point we made do with what we had.
The shed was held up with very short metal screws (perhaps 10 millilitres) and a plastic black washer to stop them driving through the aluminium sheets. We only needed our cordless power drill (a cross screw head) to unscrew them all.
Once the roof came off, the rest of the shed suddenly became much easier. At that stage the structure loses most of its strength and starts coming apart fairly quickly.
3. Dismantle the Remaining Structure
This was not our case, but if you have any loose side panels, remove these first. Similarly for doors held on hinges (again, this was not our case).
Now that the shed felt less intimidating, the rest of the demolition was followed by removing doors, side panels and the back panel as the last piece. Most of the screws came out fairly easily at first, although some of the older fixings were completely seized with rust and had to be forced out (crowbar was useful to force the screw through the aluminium). Be careful, the metal edges were incredibly sharp, especially where rust had weakened the panels.
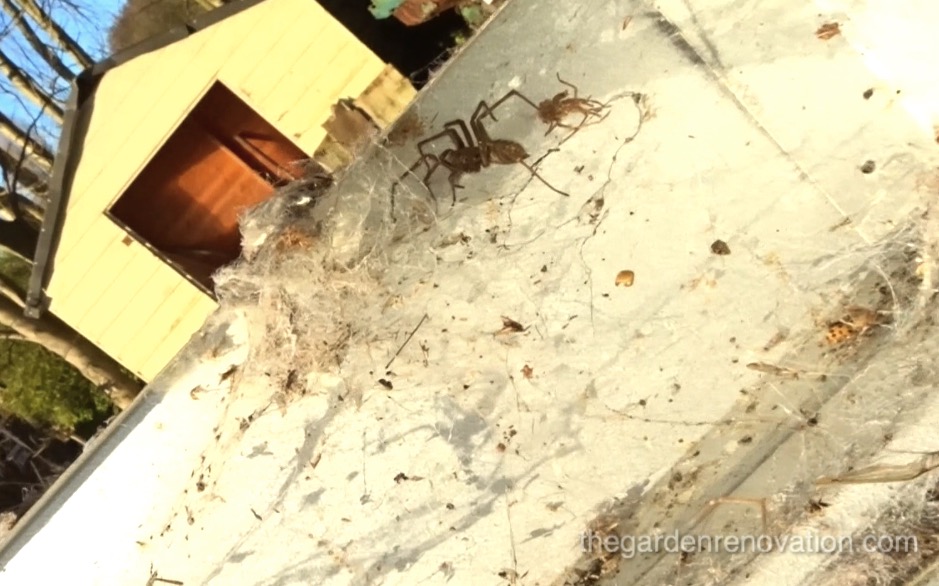
For the rest of the demolition, we had to deal with our unwanted tenants – spiders. Judging by the number of spider webs, they had enjoyed a dry and dark home for some time. Again, our crowbar was indeed very helpful in persuading the tenants that they had overstayed their welcome, or actually that they were never welcome in the first place.
4. Tidy up and dispose of loose parts
One thing we realised very quickly was that clearing as you go makes the whole job much safer. The temptation is to rip everything down first and deal with the mess afterward, but the garden becomes chaotic fast. So we stacked panels as we removed them to stop the garden becoming completely covered in sharp debris. At this point it actually started feeling like progress was finally happening and we could properly imagine the garden becoming something better.
By the end of the day, we had managed to remove the roof, the two doors, the front panel and one of the side panels. Early winter night-time surprised us and we have not managed to finish in time before the day was gone.
How to Dispose of an Old Metal Shed
Once everything was dismantled, the next challenge was actually getting rid of it all (or so we thought).
Your Main Options
- Recycling centre disposal (if you can transport it yourself)
- Skip Hire (worth considering if you’re doing a larger garden renovation at the same time)
- Scrap Metal Collection (depending on where you live, some scrap collectors may take the metal away for free)
Since our green and mossy lawn was covered in the metal panels, it was time for the disposal. The initial plan was to take the metal panels to the recycling centre in our Ford Fiesta. We carried the panels from the back garden to the front porch and left them there before heading into the city centre.
When we came back, every bit of metal we’d left piled up at the front of the house had vanished. We had a good laugh about it and figured a scrap collector must have passed by while we were out — they saved us a job and it was all for free!
What We Found Underneath
One thing that surprised us was how much hidden debris had built up underneath both the shed and decking.
There were:
- old screws
- broken fixings
- rusted metal fragments
- weeds growing through gaps
- years of trapped dirt and rubbish
If you’re doing this yourself, I’d highly recommend checking the area carefully afterward, especially if children or pets will use the garden later.
A magnetic sweeper would have made life much easier here.
How Long Does It Take?
For us, this became a full weekend project once the decking removal and cleanup were included.
For a typical metal shed alone, I’d estimate:
- a day dedicated to dismantling
- extra time for waste disposal and clearing debris
If everything is badly rusted or overgrown, allow longer than you think you’ll need.
DIY Shed Removal Cost Estimate
The good news is that this is a relatively cheap DIY project if you already own basic tools.
Rough Costs
| Item | Estimated Cost |
|---|---|
| Protective gear | £20–£50 |
| Basic tools | £20–£60 |
| Skip hire (optional) | £150–£300 |
| Recycling centre trip | Usually minimal |
Compared to paying for professional demolition, doing it yourself can save a decent amount of money.
Final Thoughts
Looking back, this was the weekend the garden renovation finally felt real.
It was messy, exhausting, and definitely harder work than we expected — but removing the old shed and decking completely changed how the garden felt.
For the first time, we could actually see the potential of the space underneath all the clutter.
And honestly, that’s one of the most satisfying parts of any renovation project.
Welcome back!
If today you do not feel like reading, feel free to watch the video below! 🙂
The rule for this weekend was – before we start any renovation, we need to clear up the area.
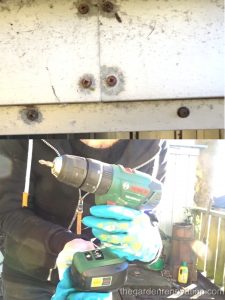
Since last week, we have decided that the metal shed had to go… R took on this demolition task! The shed was mainly held up with very short metal screws (perhaps 10 millilitres) and a plastic black washer to stop them driving through the aluminium sheets. With our cordless power drill (a cross screw head) we started to unscrew!
The flat roof of the shed went as first. Since the shed was at the back corner of our property, R performed some acrobatics and precarious balancing on the neighbour’s fence (which you can see on the video 😀 ) to get all the screws. She started from the roof, followed by doors, sides and the back as the last piece. I showed up as she was finishing up with the last few screws from the roof and helped pull the sheets off the shed and onto the garden floor. For the rest of the demolition, we had to deal with our unwanted tenants – spiders – they had enjoyed a dry and dark home for some time judging by the number of spider webs. Our crowbar was indeed very helpful in persuading the tenants that they had overstayed their welcome, or actually that they were never welcome in the first place.
Most of the screws from the shed came out with little effort, but some others had oxidised and were pretty well stuck, surprisingly none of the cross-heads was scraped clean, but in a few occasions we had to use the crowbar to force the screw through the aluminium. By the end of the day, we had managed to remove the roof, the two doors, the front wall and one of the side walls. Unfortunately, due to winter time, we could not get to the rest of the screws in time before the day was gone.
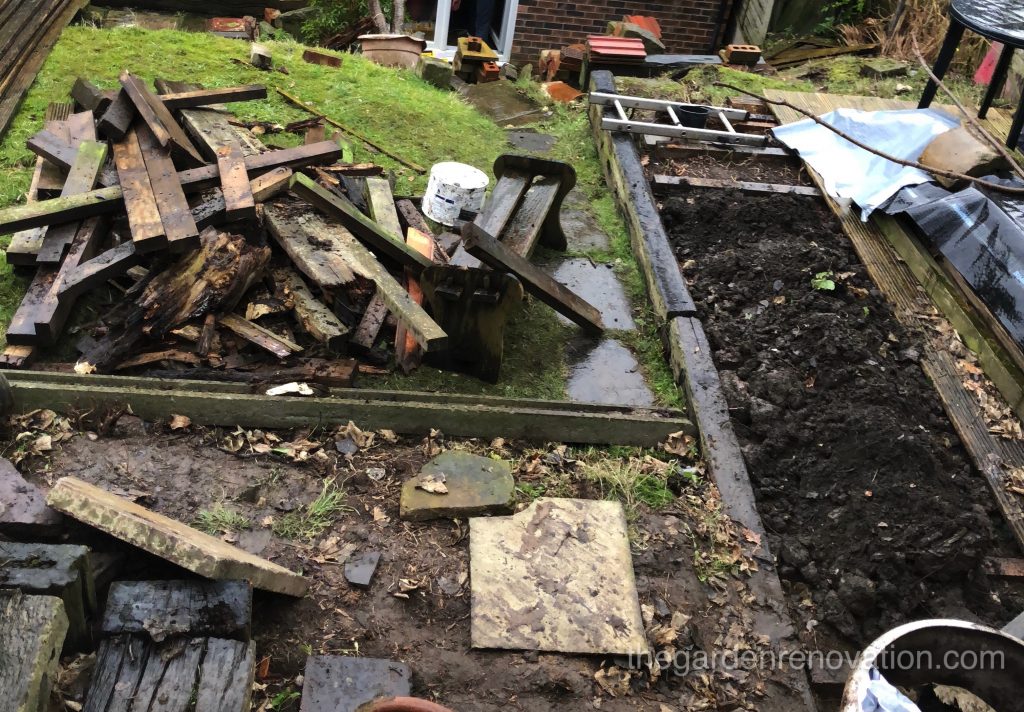
While R was fighting with the shed, I moved on to the other task we had started the week before, getting rid of the rotten and broken wood. The previous weekend we got out into the garden with the intention to assess the situation and start the clear up, but we ended up making a big mess in the middle of the garden with parts of broken fence and old rotten wooden posts. Each of these posts was riddled with 100 millilitres steel nails that by now were completely rusted. So the small semi-flat area of grass at the top of our garden was now filled with a rusty spiky wooden pile and needed to be taken to the skip urgently.
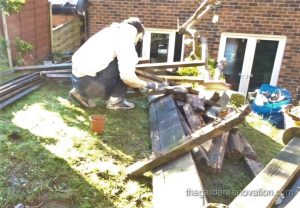
I started to go through the pile and found myself sorting it. On the left, I put all the wood that was too far gone or had too many nails to be worth removing and on the right, I moved all the lumber that was still in good condition and that we could potentially use for future fixes or builds. It turns out that hammering out 5 x 100 milliliters rusty nail from 10 x 10 centimeter timber is not easy work, almost all nails seemed to prefer to bend out of shape rather than slide out the way they had originally come from… as a result I only salvaged 6-8 pieces of wood and the rest went into the tip pile.
Now, the next challenge was getting the discard pile to the skip…
Just to illustrate how well equipped we are for this renovation, our means of transporting materials is our trusty Ford – hatchback type 😀 . We have a small 1.6-litre diesel car that we bought to commute to work which now doubles as a van. Obviously, it’s not a van and even when we put the back seats down, there is not enough space to fit a 3-meter long spiky scrap lumber. The solution was to move all the scraps to the front porch of the house and then cut them to about 90 centimetres (the width of the booth). As a result, for some part of the afternoon, I made a good use of our jigsaw and cut into smaller pieces all the scarps.
You will agree that this does not sound too bad – we’ve got an electric tool and a car to carry it all away, but still, there was a bit more involvement where wood was 15 centimetres and my jigsaw blade only goes about 10 centimetres… I tried to cut through it, thinking that maybe I would do two passes – one form each side. The jigsaw would have none of it, it was barely making a dent in the wood and I did not want to risk breaking the saw so I decided to saw these by hand with a hand saw.
The drive to the skip was quite fun, a car filled to the brim with rotted wood and rusty nails, but since its only 5 minutes down the road, I took my time and took extra care not to turn too sharply. The rest of the day was spent driving back and forth a couple of times to the skip and clearing all the wood out of the way. In the end, it got very dark way too quickly!
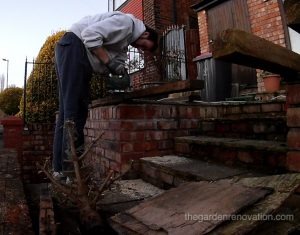
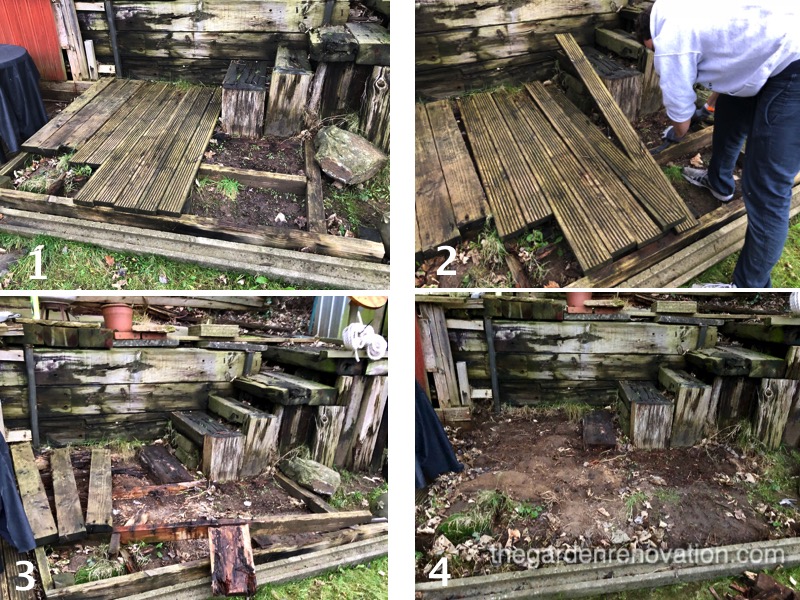
Another task, we got ourselves cracking on was partially removing the decking, as well as the red panelling covering the support for the wooden shed (see the photo below). By removing the panelling, we discovered that both platform and the shed are already leaning by about 3-4 centimetres. In terms of good news, we could now see that the railway sleepers which are holding the whole shed are still in a pretty good condition!
Our shed was leaning because at the very back of our garden, there is an old wooden retaining wall which was now leaning and pushing against our shed. This not only made the shed to change the position but it also made it rot from one side as the moisture was gradually accumulating (see previous post for the photo of the damage). That day, we decided we should at least partially remove the wooden retaining wall and to do that we had to dig out some of the earth from behind the shed. As our lawn space was taken out by all sort of wood rubbish, we have decided to partially remove our decking to make a space for the earth. The removal of the decking planks was pretty easy I must say! The planks were fixed with really long screws and we got these out with our cordless drill.
Overall, I would say we had a successful first weekend of renovation. Clearing out all the old broken and unwanted things has this positive effect, makes you feel a little lighter. On top of that, removing the clutter gives you a picture as to what should go next. There is a lot more that we need to clear out, we still have the old rotten decking, the aluminium from the shed, plenty of stones and bricks left over form a 10-year-old extension… And while there is lots more things to do, we will get them another day…
See you next time!
Checkout the next article Weekend 2 – Dismantling the platform and decking.
Thank you for the terrific post
It works quite well for me